Quickstart
Welcome to the Ren'Py quickstart manual. The purpose of this manual is to demonstrate how you can make a Ren'Py game from scratch in a few easy steps. We'll do this by showing how to make a simple game, The Question.
The Ren'Py Launcher
Before you begin making a game, you should first take some time to learn how the Ren'Py launcher works. The launcher lets you create, manage, edit, and run Ren'Py projects.
Getting Started. To get started you'll want to download Ren'Py.
Once you've downloaded Ren'Py, you'll want to extract and run it.
On Windows, double click on the executable file you download. It will extract Ren'Py into a folder named
renpy-<version>. You can change into that folder and runrenpy.exe. (It may be presented asrenpyif extensions are hidden.)On Mac OS X, double-click on the downloaded drive image to mount it as a drive. When the drive opens, copy the folder named
renpy-<version>somewhere else. (Where does not matter, but it has to be moved out of the read-only drive image. Do not move the renpy app out of the folder it's in – it won't work elsewhere.) Then change into it, and run therenpyapplication.On Linux, unpack the tarball, change into the
renpy-<version>directory, and then runrenpy.sh.
After running this, the Ren'Py launcher should run.
The Ren'Py launcher has been translated to multiple languages. To change the language, choose "preferences" at the bottom right, and then select the language.
Choosing and Launching a Project. You should first see what the completed The Question game looks like. To do this, start the Ren'Py launcher, and choose "The Question" from the first screen. Choose "Launch Project" to start The Question.
You can get back to the Ren'Py demo by doing the same thing, but choosing "Tutorial" instead of "The Question".
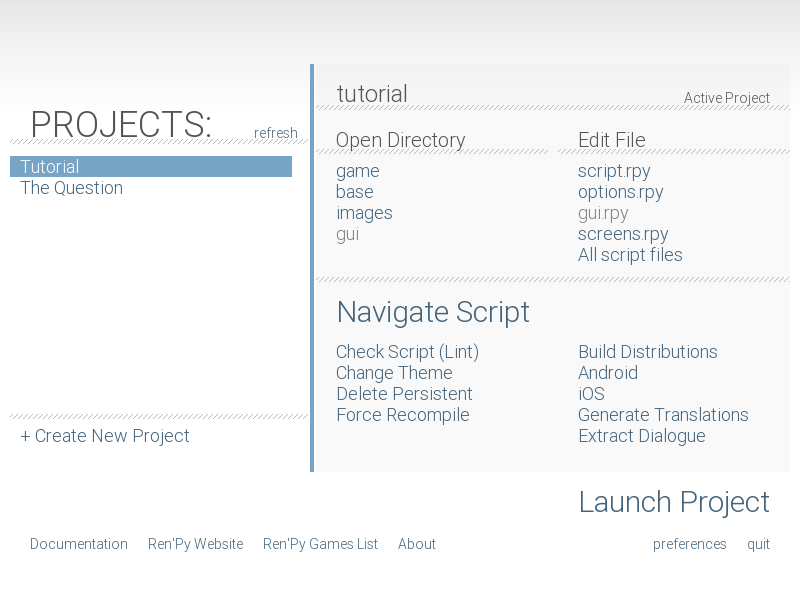
The main screen of the Ren'Py launcher.
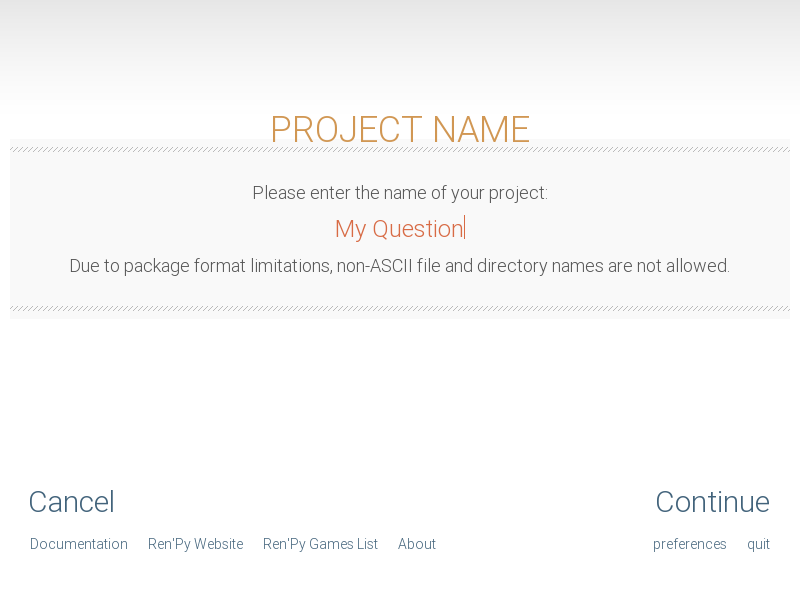
Naming a new project.
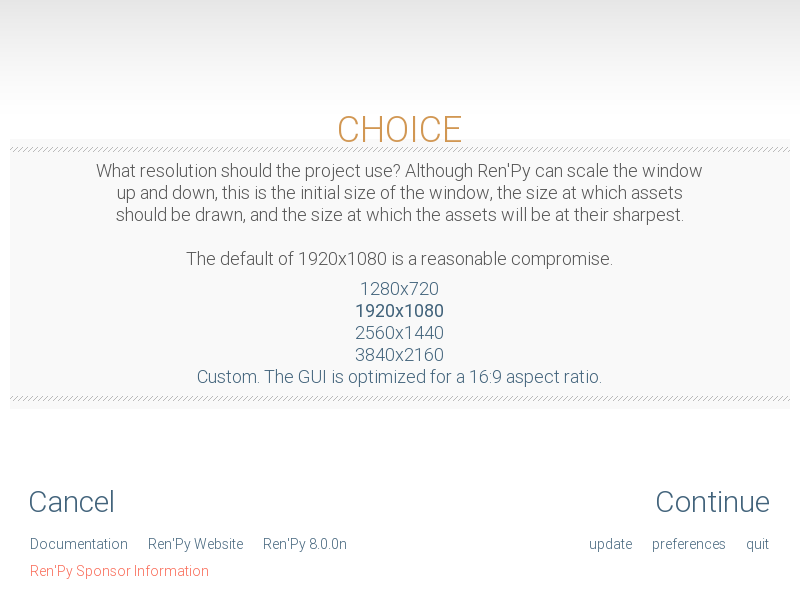
Selecting the project resolution.
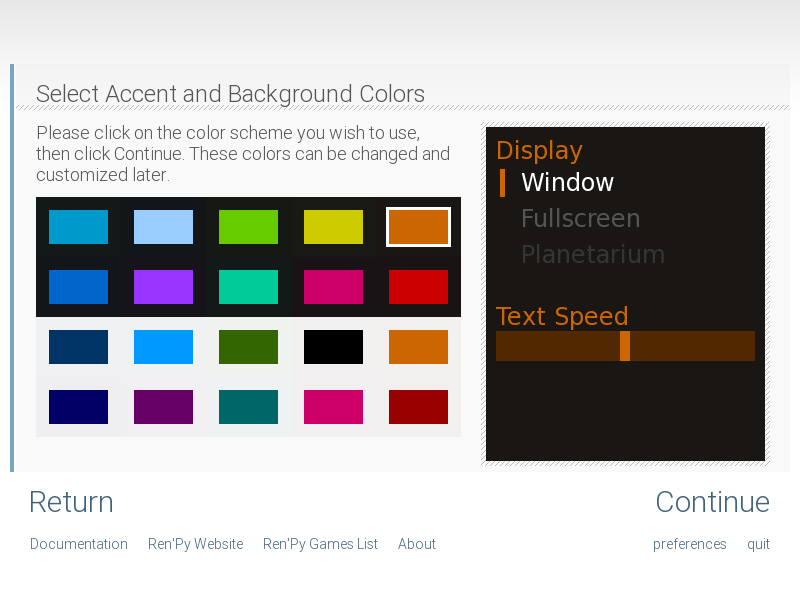
Selecting the accent and background colors for the default theme.
Creating a new Project. Create a new project by choosing "Create New Project" from the launcher.
If this is your first time creating a project, Ren'Py may ask you to select the projects directory. This is a directory (also called a folder) where new projects are created, and is scanned for existing projects. The directory chooser might pop up below Ren'Py, so be sure to look for it there.
The launcher will then ask you for a project name. Since "The Question" is already taken, you should enter something different, like "My Question", and type enter.
After that, the launcher will ask you to select the project resolution. 1280x720 is a good compromise between game size and image quality. For the purpose of this tutorial, we will select 1280x720 to match "The Question" game art, then click "Continue".
The launcher will then ask you to choose a color scheme – an accent and background color for the new GUI. It doesn't matter what you pick at this point, so just pick something you find appealing, and then click "Continue".
At this point, Ren'Py will process for a bit, and spit out a simple game template. The template used placeholder art and text, but is runnable, and supports expected features like rollback, loading, and saving. Choose "Launch Project" to run it.
A Simple Game
label start:

    "Sylvie" "Hi there! How was class?"

    "Me" "Good..."

    "I can't bring myself to admit that it all went in one ear and out the other."

    "Me" "Are you going home now? Wanna walk back with me?"

    "Sylvie" "Sure!"
This is a very simple Ren'Py game. It doesn't include any pictures or music, but it does show a conversation between two characters, and a line of narration.
To try this out, from the top screen of the launcher select "My Question" project, and then choose "script.rpy" from under Edit File. If this is your first time, Ren'Py will ask you to select an editor. We recommend Visual Studio Code for new creators - in addition to being a solid choice, the launcher can also download it for you. Then it will open the script file in the editor.
Once the editor opens, erase everything in script.rpy. We're starting
from scratch, so you don't need what's there. Copy the example above into
script.rpy, and save it.
You're now ready to run this example. Go back to the launcher, and choose "Launch Project". Ren'Py will start up. Notice how, without any extra work, Ren'Py has given you menus that let you load and save the game, and change various preferences. When ready, click "Launch Project", and play through this example game.
This example shows some of the commonly-used Ren'Py statements.
The first line is a label statement. The label
statement is used to give a name to a place in the program. In this case,
we create a label named start. The start label is special, as it's
where Ren'Py scripts begin running when the user clicks "Start Game" on
the main menu.
The other lines are say statements. There are two forms of the say statement. The first is a string (beginning with a double-quote, containing characters, and ending with a double-quote) on a line by itself, which is used for narration, and the thoughts of the main character. The second form consists of two strings. It's used for dialogue, with the first string being a character name and the second being what that character is saying.
Note that all the say statements are indented by four spaces. This is because they are a block underneath the label statement. In Ren'Py, blocks must be indented relative to the prior statement, and all of the statements in a block must be indented by the same amount.
When strings contain double-quote characters, those characters need to be preceded by a backslash. For example
"Sylvie" "Did you ever hear Lincon's famous saying, \"The problem with Internet quotations is that many of them are not genuine.\""
While this simple game isn't much to look at, it's an example of how easy it is to get something working in Ren'Py. We'll add the pictures in a little bit, but first, let's see how to define characters.
Characters
Main article: Defining Character Objects
One problem with the first example is that it requires you to repeatedly type the name of a character each time they speak. In a dialogue-heavy game, this might be a lot of typing. Also, both character names are displayed in the same way, in the accent color selected when starting the game. To fix this, Ren'Py lets you define characters in advance. This lets you associate a short name with a character, and to change the color of the character's name.
define s = Character('Sylvie', color="#c8ffc8")
define m = Character('Me', color="#c8c8ff")

label start:

    s "Hi there! How was class?"

    m "Good..."

    "I can't bring myself to admit that it all went in one ear and out the other."

    s "Are you going home now? Wanna walk back with me?"

    m "Sure!"
The first and and second lines define characters. The first line defines a character with the short name of "s", the long name "Sylvie", with a name that is shown in a greenish color. (The colors are red-green-blue hex triples, as used in web pages.)
The second line creates a character with a short name "m", a long name "Me", with the name shown in a bluish color. Other characters can be defined by copying one of the character lines, and changing the short name, long name, and color.
We've also changed the say statements to use character objects instead of a character name string. This tells Ren'Py to use the characters we defined.
Images
Main article: Displaying Images
A visual novel isn't much of a visual novel without pictures. Here's another scene from "The Question". This also includes statements that show images to the player. This can fully replace the previous section of script, if you want to try it out.
define s = Character('Sylvie', color="#c8ffc8")
define m = Character('Me', color="#c8c8ff")

label start:

    scene bg meadow

    "After a short while, we reach the meadows just outside the neighborhood where we both live."

    "It's a scenic view I've grown used to. Autumn is especially beautiful here."

    "When we were children, we played in these meadows a lot, so they're full of memories."

    m "Hey... Umm..."

    show sylvie green smile

    "She turns to me and smiles. She looks so welcoming that I feel my nervousness melt away."

    "I'll ask her...!"

    m "Ummm... Will you..."

    m "Will you be my artist for a visual novel?"

    show sylvie green surprised

    "Silence."
This segment of script introduces two new statements. The scene statement on
line 6 clears all images and displays a background image. The show statements
on lines 16 and 26 display a sprite on top of the background, and change the
displaying sprite, respectively.
In Ren'Py, each image has a name. The name consists of a tag, and optionally one or more attributes. Both the tag and attributes should begin with a letter, and contain letters, numbers, and underscores. For example:
In the scene statement on line 6, the tag is "bg", and the attribute is "meadow." By convention, background images should use the tag bg.
In the first show statement on line 16, the tag is "sylvie", and the attributes are "green" and "smile".
In the second show statement on line 26, the tag is "sylvie", and the attributes are "green" and "surprised".
Only one image with a given tag can be shown at the same time. When a second image with the same tag is show, it replaces the first image, as happens on line 26.
Ren'Py searches for image files in the images directory, which can be found by selecting "images" in the "Open Directory" section of the launcher. Ren'Py expects character art to be an PNG, WEBP, or AVIF file, while background art should be a JPG, JPEG, PNG, WEBP, or AVIF file. SVG files are also supported, but mostly used to customize the interface. The name of a file is very important – the extension is removed, the file name is forced to lowercase, and that's used as the image name.
For example, the following files, placed in the images directory, define the following images.
"bg meadow.jpg" ->
bg meadow"sylvie green smile.png" ->
sylvie green smile"sylvie green surprised.png" ->
sylvie green surprised
Since the filenames are lowercase, the following also holds.
"Sylvie Green Surprised.png" ->
sylvie green surprised
Images can be placed in subdirectories (subfolders) under the images directory. The directory name is ignored and only the filename is used to define the image name.
Hide Statement.
Ren'Py also supports a hide statement, which hides the given image.
label leaving:

    s "I'll get right on it!"

    hide sylvie

    "..."

    m "That wasn't what I meant!"
It's actually pretty rare that you'll need to use hide. Show can be used when a character is changing emotions, while scene is used when everyone leaves. You only need to use hide when a character leaves and the scene stays the same.
Image Statement.
Sometimes, a creator might not want to let Ren'Py define images
automatically. This is what the image statement is for. It should
be at the top level of the file (unindented, and before label start),
and can be used to map an image name to an image file. For example:
image logo = "renpy logo.png"
image eileen happy = "eileen_happy_blue_dress.png"
The image statement is run at init time, before label start and the rest of the game script that interacts with the player.
The image statement can also be used for more complex tasks, but that's discussed elsewhere.
Transitions
Main article: Transitions
In the script above, pictures pop in and out instantaneously. Since changing location or having a character enter or leave a scene is important, Ren'Py supports transitions that allow effects to be applied when what is being shown changes.
Transitions change what is displayed from what it was at the end of the last interaction (dialogue, menu, or transition – among other statements) to what it looks like after scene, show, and hide statements have run.
label start:

    scene bg meadow
    with fade

    "After a short while, we reach the meadows just outside the neighborhood where we both live."

    "It's a scenic view I've grown used to. Autumn is especially beautiful here."

    "When we were children, we played in these meadows a lot, so they're full of memories."

    m "Hey... Umm..."

    show sylvie green smile
    with dissolve

    "She turns to me and smiles. She looks so welcoming that I feel my nervousness melt away."

    "I'll ask her...!"

    m "Ummm... Will you..."

    m "Will you be my artist for a visual novel?"
The with statement takes the name of a transition to use. The most
common one is dissolve which dissolves from one screen to the
next. Another useful transition is fade which fades the
screen to black, and then fades in the new screen.
When a transition is placed after multiple scene, show, or hide statements, it applies to them all at once. If you were to write:
    scene bg meadow
    show sylvie green smile
    with dissolve
Both the "bg meadow" and "sylvie green smile" images would be dissolved in at the same time. To dissolve them in one at a time, you need to write two with statements:
    scene bg meadow
    with dissolve
    show sylvie green smile
    with dissolve
This first dissolves in the meadow, and then dissolves in sylvie. If you wanted to instantly show the meadow, and then show sylvie, you could write:
    scene bg meadow
    with None
    show sylvie smile
    with dissolve
Here, None is used to indicate a special transition that updates Ren'Py's idea of what the prior screen was, without actually showing anything to the player.
Positions
Main article: Transforms
By default, images are shown centered horizontally, and with their bottom edge touching the bottom of the screen. This is usually okay for backgrounds and single characters, but when showing more than one character on the screen it probably makes sense to do it at another position. It also might make sense to reposition a character for story purposes.
show sylvie green smile at right
To do this repositioning, add an at clause to a show statement. The at
clause takes a position, and shows the image at that position. Ren'Py
includes several predefined positions: left for the left side of
the screen, right for the right side, center for centered
horizontally (the default), and truecenter for centered
horizontally and vertically.
Creators can define their own positions, and event complicated moves, but that's outside of the scope of this quickstart.
Music and Sound
Main article: Audio
Most Ren'Py games play music in the background. Music is played with the
play music statement. The play music statement takes a filename that
is interpreted as an audio file to play. Audio filenames are interpreted
relative to the game directory. Audio files should be in opus, ogg vorbis,
or mp3 format.
For example:
play music "audio/illurock.ogg"
When changing music, one can supply a fadeout and a fadein clause, which
are used to fade out the old music and fade in the new music.
play music "audio/illurock.ogg" fadeout 1.0 fadein 1.0
The queue music statement plays an audio file after the current file
finishes playing.
queue music "audio/next_track.opus"
Music can be stopped with the stop music statement, which can also
optionally take a fadeout clause.
stop music
Sound effects can be played with the play sound statement. Unlike music, sound
effects do not loop.
play sound "audio/effect.ogg"
When a filename is in the game/audio directory, and the name without the
file extension can be used as a Python variable (that is, it begins with
a letter, and contains only letters, numbers, and underscores), it is possible
to play that file without using quotes.
For example, if game/audio/illurock.ogg exists, we can write:
play music illurock
See the audio namespace for more details.
Pause Statement
The pause statement causes Ren'Py to pause until the mouse is clicked.
pause
If a number is given, the pause will end when that number of seconds have elapsed.
pause 3.0
Ending the Game
You can end the game by running the return statement, without having
called anything. Before doing this, it's best to put something in the
game that indicates that the game is ending, and perhaps giving the
user an ending number or ending name.
    ".:. Good Ending."

    return
That's all you need to make a kinetic novel, a game without any choices in it. Now, we'll look at what it takes to make a game that presents menus to the user.
Supporting Flags using the Default, Python and If Statements
Main articles: Python Statements and Conditional Statements
While some games can be made by only using the statements given above, other games require data to be stored and recalled later. For example, it might make sense for a game to remember a choice a player has made, return to a common section of the script, and act on the choice later. This is one of the reasons why Ren'Py has embedded Python support.
Here, we'll show how to store a flag containing information about a choice the player has made. To initialize the flag, use the default statement, before label start.
# True if the player has decided to compare a VN to a book.
default book = False

label start:

    s "Hi there! How was class?"
The book flag starts off initialized to the special value False
(as with the rest of Ren'Py, capitalization matters), meaning that
it is not set. If the book path is chosen, we can set it to True
using a Python assignment statement.
label book:

    $ book = True

    m "It's like an interactive book that you can read on a computer or a console."

    jump marry
Lines beginning with a dollar-sign are interpreted as Python statements. The assignment statement here assigns a value to a variable. Ren'Py has support for other ways of including Python, such as a multi-line Python statement, that are discussed in other sections of this manual. Ren'Py supports Python 2.7, though we strongly recommend you write Python that runs in Python 2 and Python 3.
To check the flag, use the if statement:
if book:

    "Our first game is based on one of Sylvie's ideas, but afterwards I get to come up with stories of my own, too."
If the condition is true, the block of script is run. If not, it is skipped.
The if statement can also take an else clause, that introduced a block of
script that is run if the condition is false.
if book:

    "Our first game is based on one of Sylvie's ideas, but afterwards I get to come up with stories of my own, too."

else:

    "Sylvie helped with the script on our first video game."
Python variables need not be simple True/False values. Variables can be used to store the player's name, a points score, or for any other purpose. Since Ren'Py includes the ability to use the full Python programming language, many things are possible.
Files In Template
The game folder in the created project includes below folders and files.
- audio/
This folder is intended to include audio files. See Audio for more details.
- cache/
This folder includes cache files. You don't need to edit those files.
- gui/
This folder includes images which are used by the gui. See the GUI Customization Guide for more details.
- images/
This folder is intended to include images files. See Displaying Images for more details.
- tl/
This folder includes translation files. See Translation for more details.
- gui.rpy
The gui variables are defined in this file. See the GUI Customization Guide for more details.
- options.rpy
Config and Build variables, a part of preferences and a part of gui variables are defined in this file. See Configuration Variables, Preference Variables, Building Distributions and the GUI Customization Guide for more details.
- screens.rpy
Screens are defined in this file. You should edit this for more advanced gui customization. Also see Styles, Style Properties, Screens and Screen Language, Screen Actions, Values, and Functions, Special Screen Names and Screen Language Optimization for more details.
- script.rpy
This file is intended to include other scripts which include a scenario. You can also add or delete any
.rpy. See Language Basics for more details.- *.rpyc
Those files are result of compiling each
.rpyfiles to reduce loading time. You don't need to edit those files without deleting the corresponding.rpyfile. See Language Basics for more details.
Releasing Your Game
Once you've made a game, there are a number of things you should do before releasing it:
- Check for a new version of Ren'Py.
New versions of Ren'Py are released on a regular basis to fix bugs and add new features. Before releasing, you'll want to click update in the launcher to update Ren'Py to the latest version. You can also download new versions and view a list of changes at https://www.renpy.org/latest.html.
Rarely, changes to Ren'Py will require you to make a change to your game's script. Incompatible Changes has a list of these changes.
- Check the Script.
From the front page of the launcher, choose "Check Script (Lint)". This will check your games for potential errors. Since some of these errors will only affect users on other platforms, it's important to understand and usually fix all errors, even if you don't see the problem on your computer.
- Build Distributions.
From the front page of the launcher, choose "Build Distributions". Based on the information contained in options.rpy, the launcher will build one or more archive files containing your game.
- Test.
Lint is not a substitute for thorough testing. It's your responsibility to check your game before it is released. Consider asking friends to help beta-test your game, as often a tester can find problems you can't.
- Release.
Once the game has been finished and tested, you should post the generated archive files on the web somewhere people can see them. (If you don't have your own website, https://itch.io hosts a lot of visual novels.) Congratulations, you've released your first visual novel!
There are a few places where a game can be announced:
The Ren'Py Games List helps us keep track of Ren'Py games being made.
The Completed Games section of the Lemma Soft Forums is a good place to tell fellow creators about your game.
More advanced vays of customizing the building of the distribution of your game can be found in the Building Distributions section.
Script of The Question
You can view the full script of ''The Question'' here.
Where do we go from here?
This Quickstart barely scratches the surface of what Ren'Py is capable of. For brevity's sake, we've omitted many features Ren'Py supports and simplified others – focusing on the minimum set of features used to make a visual novel.
To get a feel for what Ren'Py is capable of, please play through the Tutorial, and perhaps some of the games featured on the Ren'Py website. You may also want to read the rest of this manual, starting with the GUI Customization Guide.
Beyond that, we recommend checking out the Ren'Py section of the Lemma Soft Forums, which has a section for asking questions, and a cookbook section with libraries and examples meant for reuse. The Lemma Soft Forums are the central hub of the Ren'Py community, where we welcome new creators and the questions they bring.
Thank you for choosing the Ren'Py visual novel engine. We look forward to seeing what you create with it!