3D Stage
The 3D Stage, named after the stages that plays are performed on, is a concept that allows displayables to be positioned in 3 dimensions. Ren'Py will then render the displayables with the proper perspective, and will also make the z dimension available, to make things like lighting and depth rendering possible.
Coordinates
Probably the most important thing to understand about the 3D Stage is the coordinate system that Ren'Py uses for the 3D state. Here's the coordinate system that's used to place displayables in 2D:
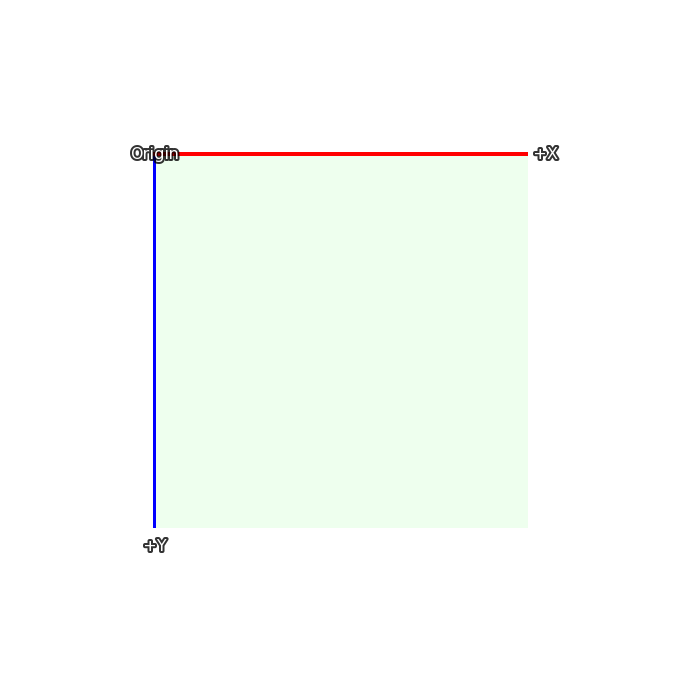
In 2D, the rectangle is the size of the screen, and the width and height
of the visible area is set using gui.init() (usually when first making
a new game).
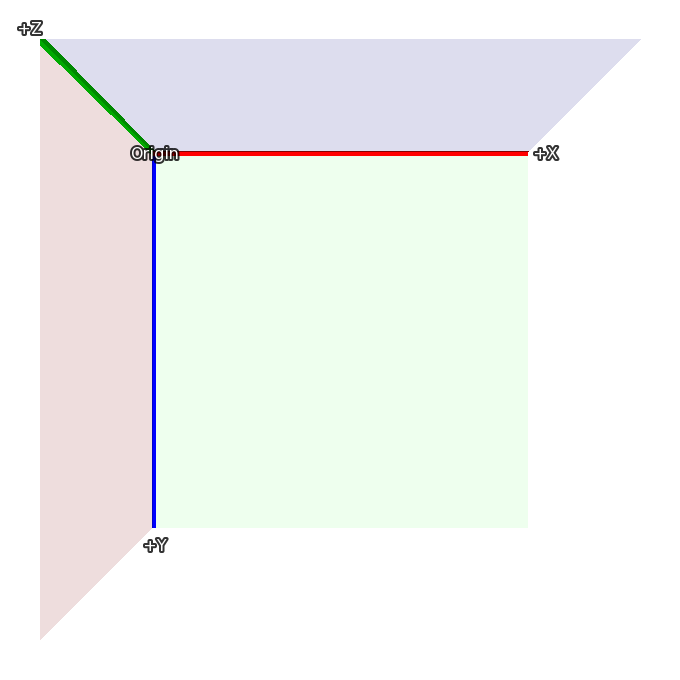
The 3D stage extends this coordinate system with a new axis, one facing towards the viewer, so that values greater than 0 bring an image closer (and make it bigger), and those less than 0 move the image away from the viewer (and make it smaller).
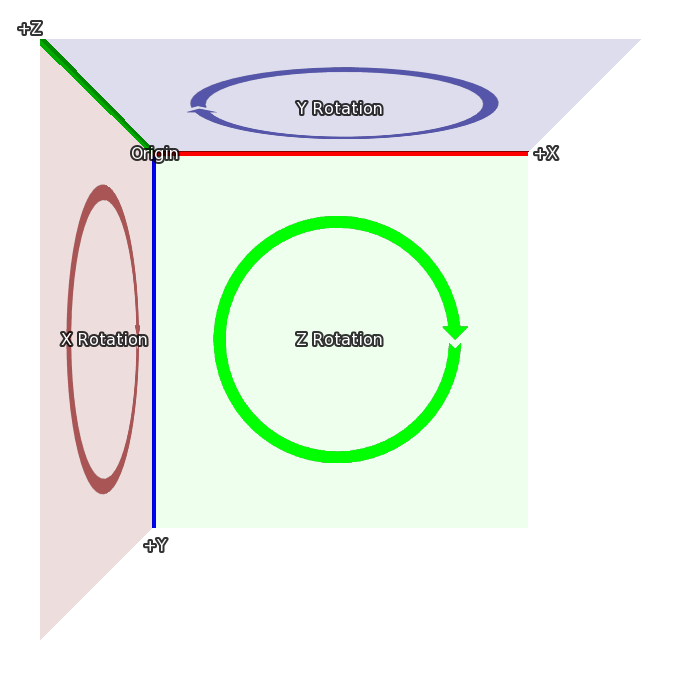
Finally, when a rotation in 3d happens, it's in the directions given here:
When rotating around Z, X moves toward Y.
When rotating around X, Y moves toward Z.
When rotating around Y, Z moves toward X.
These coordinate systems are based on those used in Ren'Py, making it easy to move from 2D to the 3D stage. When importing 3D models, coordinate transforms may be applied to ensure the model coordinates are sensible.
Camera
The initial placement of the camera is controlled by the parameters to
gui.init(). First, Ren'Py uses width and fov to compute the
default z distance. For the default fov of 75:
When width = 1280, z is about 834
When width = 1920, z is about 1251
When width = 3840, z is about 2502
Where the actual value of z is less than 1 higher than the values given
here. The default z placement can be overridden with the perspective
style property, or the config.perspective variable.
Ren'Py automatically applies an offset of (width / 2, height / 2, z) to the camera, and it looks down the -Z axis.
The z distance is also the distance from the camera to the plane where pixels on-screen have the same size as they do in the original images (ignoring window scaling). Increasing the camera's z position will make everything smaller, while decreasing it will make everything bigger.
Finally, perspective and config.perspective describe the
near and far planes, defaulting to 100 and 100000, respectively. This
means that when an image is closer than 100 z-units from the camera,
it disappears, and it also disappears if it's more than 100,000 z-units
away.
- define config.perspective = (100, z, 100000)
The default value used when
perspectiveis not set to a 3-tuple.zdepends on the size of the game, as defined above.
Using the 3D Stage
The first thing to do to use the 3D stage is to enable it for a layer, using
the camera statement. If no layer name is provided, master is used by
default. This is usually done with:
# Enabling the 3D stage for the master layer.
camera:
    perspective True
though it's possible that you'll want to include a default camera position, as described below.
Alternatively, you can provide a specific layer name to enable the 3D stage only for that layer.
# Enabling the 3D stage for the background layer.
camera background:
    perspective True
Showing images (backgrounds and sprites) works the same way as it does in when using 2D coordinates.
scene bg washington

show lucy mad at right

show eileen happy
However, it's possible to use transforms to move these displayables in three dimensional space:
scene bg washington:
    xalign 0.5 yalign 1.0 zpos -1000

show lucy mad:
    xalign 1.0 yalign 1.0 zpos 100

show eileen happy:
    xalign 0.5 yalign 1.0 zpos 200
As an ATL transform is given, the default transform is not used, and it's
necessary to specify xalign and yalign to position the
displayable in the x and y axes. Of course, transforms can also be used.
transform zbg:
    zpos -100

transform z100:
    zpos 100

transform z200:
    zpos 200

scene bg washington at center, zbg

show lucy mad at right, z100

show eileen happy at center, z200
If you try this, you'll see an empty space around the background. That's
because by moving it back, it becomes smaller, and doesn't fill the screen.
Ren'Py has an easy way of fixing this problem - zzoom. Setting
the zzoom property to True will scale an image by the amount it was shrunk
due to having a negative zpos. It's useful for backgrounds.
transform zbg:
    zpos -100 zzoom True
It's also possible to use ATL to vary zpos, just like you would xpos and ypos.
show eileen happy at center:
    zpos 0
    linear 4.0 zpos 200
Note that zpos can interact strangely with positions like left and right,
and with xalign and yalign. That's because Ren'Py will
position the images in a three dimensional rectangular volume (like a cube, but
not all the sides are the same length), and then apply perspective to the image,
which can cause parts of the image to move offscreen.
It's possible to move the camera, as well, using camera. For example,
camera:
    perspective True
    xpos 0
    linear 3.0 xpos 500
When doing this, it probably makes sense to use background images that are larger than the window.
If you apply a zpos to a sprite, and it doesn't take effect, the reason is
probably because you omitted the perspective clause of the camera
transform.
The camera can be rotated, with:
camera:
    perspective True
    rotate 45
As the camera is what is rotating, the rotation is in the opposite direction as one that rotates a displayable.
Depth
By default, Ren'Py will display the images in its usual order, with the last image to be shown above the others. This might lead to odd results, like an image that is closer (using perspective) beign shown behind one that's farther away.
If your game shows images out of order like this, you can tell the GPU
to sort by depth, using gl_depth:
camera:
    perspective True
    gl_depth True
Slight rounding errors can cause images that are nominally at the same depth to appear above or below each other. Flattening these images and displaying them together may be the solution to this.
Matrix Transforms
Ren'Py uses the matrixtransform transform property to apply a matrix
to displayables, which allows an image to be scaled, offset, and rotated in
three-dimensional space. This property takes either a Matrix() or a
TransformMatrix (defined below), and applies it to the vertices at the corners
of the images being displayed.
Ren'Py uses the matrixanchor transform property to make applying a
matrix easier. This defaults to (0.5, 0.5), and is translated to a pixel offset
inside the image being transformed using the usual Ren'Py anchor rules. (If it's
an integer or absolute, it's considered a number of pixels, otherwise it's a
fraction of the size of the image.)
Ren'Py applies the image by first shifting the image so the anchor is at (0, 0, 0). It then applies the transform, and then shifts it back by the same amount. Using the defaults, this means that the matrix will be applied to the center of the image.
For example:
show eileen happy at center:
    matrixtransform RotateMatrix(45, 0, 0)
Will rotate the image around the line going horizontally through it's center. The top of the image will move back, and then bottom of the image will move forwards.
Matrixes can be chained together with multiplication. It's easiest to think about them being applied right to left. In this example:
show eileen happy at center:
    matrixtransform RotateMatrix(45, 0, 0) * OffsetMatrix(0, -300, 0)
The image will be shifted up by 300 pixels, and then will be rotated around the X axis.
Structural Similarity
In ATL, interpolating the matrixtransform property requires the
use of TransformMatrixes that have structural similarity. That means the same
types of TransformMatrix, multiplied together in the same order.
As an example, the following will rotate and offset, then move back:
show eileen happy at center:
    matrixtransform RotateMatrix(0, 0, 0) * OffsetMatrix(0, 0, 0)
    linear 2.0 matrixtransform RotateMatrix(45, 0, 0) * OffsetMatrix(0, -300, 0)
    linear 2.0 matrixtransform RotateMatrix(0, 0, 0) * OffsetMatrix(0, 0, 0)
While the first setting of matrixtransform may seem unnecessary, it is required to provide a base for the first linear interpolation. If it wasn't present, that interpolation would be skipped.
TransformMatrix
While Matrix objects are suitable for static transformations, they're not useful for animating changing transformations. It's also useful to have a way of taking common matrices and encapsulating them in a way that allows the matrix to be parameterized.
The TransformMatrix is a base class that is extended by a number of Matrix-creating classes. Instances of TransformMatrix are called by Ren'Py, and return Matrixes. TransformMatrix is well integrated with ATL, allowing for matrixtransform animations.
transform xrotate:
    matrixtransform RotateMatrix(0.0, 0.0, 0.0)
    linear 4.0 matrixtransform RotateMatrix(360.0, 0.0, 0.0)
    repeat
Subclasses of TransformMatrix are expected to implement the __call__ method.
This method takes:
An old object to interpolate off of. This object may be of any class, and may be None if no old object exists.
A value between 0.0 and 1.0, representing the point to interpolate. 0.0 is entirely the old object, and 1.0 is entirely the new object.
Built-In TransformMatrix Subclasses
See also
SplineMatrix, which works with TransformMatrix subclasses.
The following is the list of TransformMatrix subclasses that are built into Ren'Py.
- class OffsetMatrix(x, y, z)
A TransformMatrix that returns a matrix that offsets the vertex by a fixed amount.
- class RotateMatrix(x, y, z)
A TransformMatrix that returns a matrix that rotates the displayable around the origin.
- x, y, z
The amount to rotate around the origin, in degrees.
The rotations are applied in order:
A clockwise rotation by x degrees in the Y/Z plane.
A clockwise rotation by y degrees in the Z/X plane.
A clockwise rotation by z degrees in the X/Y plane.
- class ScaleMatrix(x, y, z)
A TransformMatrix that returns a matrix that scales the displayable.
- x, y, z
The factor to scale each axis by.
Transform Properties
The following transform properties are used by the 3D Stage.
- matrixanchor
- Type:
(position, position)
- Default:
(0.5, 0.5)
This gives the position of the matrix anchor relative to the image. If the variables are floats, this is relative to the size of the child, otherwise it's absolute pixels.
This sets the location of the (0, 0, 0) point that point_to, orientation, xrotate, yrotate, zrotate and matrixtransform apply their transforms to.
- point_to
- Type:
(float, float, float), Camera, or None
- Default:
None
This gives a position to which to point. The camera or the displayable being transformed are rotated to face that point, even if the position of the camera or the displayable is changed.
If this is None, no point-of-interest rotation is applied.
If this is not None, this is a 3-tuple or an instance of
Camera(). An (x, y, z) format tuple represents the position of the point of interest. An instance of Camera means to point at the camera.Note point_to isn't updated automatically. so, you should write like below if you want it is updated:
# eileen always faces to the camera.
show eileen happy at center:
    point_to Camera()
    0
    repeat
- class Camera(layer='master')
Instances of this class can be used with point_to to point at the location of the camera for a particular layer.
- layer
The name of the layer.
- orientation
- Type:
(float, float, float) or None
- Default:
None
This rotates the camera or the displayable. The three values are the x, y, and z rotations, in degrees. The rotations are applied in x, y, z order for displayables, and z, y, x order for the camera.
When interpolation is used with orientation, the shortest path is taken between the old and new orientations.
If this is None, no orientation is applied.
- xrotate
- Type:
float or None
- Default:
None
This rotates the camera or the displayable around the x axis. The value is the rotation, in degrees. Rotations are applied to displayables in x, y, z order. Rotations are applied to the camera in z, y, x order.
If this is None, no x-axis rotation is applied.
- yrotate
- Type:
float or None
- Default:
None
This rotates the camera or the displayable around the y axis. The value is the rotation, in degrees. Rotations are applied to displayables in x, y, z order. Rotations are applied to the camera in z, y, x order.
If this is None, no y-axis rotation is applied.
- zrotate
- Type:
float or None
- Default:
None
This rotates the camera or the displayable around the z axis. The value is the rotation, in degrees. Rotations are applied to displayables in x, y, z order. Rotations are applied to the camera in z, y, x order.
If this is None, no z-axis rotation is applied.
- matrixtransform
- Type:
None or Matrix or TransformMatrix
- Default:
None
If not None, this gives a matrix that is used to transform the vertices of the child of the transform. The transformation goes from the coordinates used by the screen to the coordinates used by the child of the transform.
Interpolations involving this property are only supported when using a TransformMatrix, and when the TransformMatrix values are structurally similar, as described above.
- perspective
- Type:
True or False or Float or (Float, Float, Float)
- Default:
None
When applied to a transform, this enables perspective rendering. This takes a triple, giving the near plane, z-distance to the 1:1 plane, and far plane.
If a single float, the distances to the near and far planes are taken from
config.perspective. If True, all three values are taken from that variable.When perspective is not false, the meaning of the
xpos,ypos,zpos, androtateare inverted, providing the effect of positioning the camera rather than the child.As the perspective transformation assumes it's aligned with the window, it doesn't make sense to reposition it using
xanchor, andyanchor, or properties that set those, such asanchor,align,center, etc.
- zpos
- Type:
float
- Default:
0
This offsets the child along the z-axis. When perspective is false, this is used directly, otherwise it is multiplied by -1 and used.
If setting this causes the child to disappear, it's likely that the transform is not being used with a displayable where zpos is False.
- zzoom
- Type:
bool
- Default:
False
If this is true, the z-distance to the 1:1 plane (zone) is determined, along with this displayable's zpos. The child is then scaled by (zone - zpos) / zone in the x and y axes.
The intended use for this is in displaying a background with a negative zpos, which would normally make the background small. Setting this to true means that the background will be displayed at 1:1 size.